Table of Contents
Burning the Bootloader
If one uses an Atmega328 chip in his Arduino or Paperduino project one needs to burn a bootloader. That program allows later for an easy upload of programs. For the Paper-Arduino-Clones we have to burn the Arduino UNO bootloader on our ATmega chip. Depending on the burning device there are a lot of different technics to do so.
Burning the Bootloader with the Arduino IDE
For burning the bootloader on the Paperduino-UNO, or on the Paper-Leonardo you need to connect the following pins on your Paperduino-UNO with your ISP programmer (in-system programmer):
- 11 - MOSI
- 12 - MISO
- 13 - SCK
- Reset
- Ground
- + 5V
After connecting the programmer to your computer select in the Arduino IDE in Tools/Programmer your programmer and than click Tools/Burn Bootloader.
... and an AVR programmer

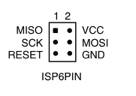
On the photo one sees the ISP programmer with an ISP adapter board. But you could also build your own modified wire like that on the Mini Bootloader project. Anyway here are the connection of an original ISP header.
Cause my ISP programmer has a different protocol than the original AVR ISP programmer I had to modifier the programmers.txt file.
In that folder (on Linux):
/usr/share/arduino/hardware/arduino
The third line has to change to:
avrisp.protocol=stk500v2
... and the Paper-USBasp Programmer
A USBasp programmer will be used similar than the AVR ISP programmer, just select the USBasp programmer and burn.

Here is a manual for building your own Paper-USBasp programmmer.
... and a Paperduino-UNO
The Paperduino-UNO was designed for cloning and that's why you can use easiely your Paperduino-UNO for burning the bootloder. Just load the ArduinoISP program from the Arduino IDE examples on your Paperduino-UNO. After that, turn off the auto reset by removing the auto reset jumper. And than connect the pins like that:
- 13 to 13
- 12 to 12
- 11 to 11
- 10 to Reset
- Ground to Ground
- +5V to +5V
… and than burn!

Burning an Atmega328 (without P)
The Atmega328 chip has a different signature than the Atmega328p (p stands for picoPower). When one wants to burn this chip with the IDE the avrdude.conf file has to be changed.
Open the file:
/usr/share/arduino/hardware/tools/avrdude.conf
or (depends on the Arduino version):
/usr/share/arduino/hardware/tools/avr/etc/avrdude.conf
search for the Atmega328p signature:
0x1e 0x95 0x0F
and replace it with the Atmega328 signature:
0x1e 0x95 0x14
Now it should be possible to burn the Atmega328 with the Arduino IDE. Don't forget to change it back for the P version of the Atmega chip.
Burning the Bootloader with the AVRdude
Burning the bootloader on an Atmega328p chip of a Paperduino-Uno or a Paper-Duino-Pi with an AVR ISP programmer in command line (Linux). If it's not already installed one needs to install the Avrdude.
$ sudo pacman -S avrdude
Go to the folder with the bootloader:
$ cd /usr/share/arduino/hardware/arduino/avr/bootloaders/optiboot/
Fuse Bits
In the board.txt file for the Arduino UNO the fuse bits are set like that:
uno.bootloader.low_fuses=0xFF
uno.bootloader.high_fuses=0xDE
uno.bootloader.extended_fuses=0xFD
uno.bootloader.unlock_bits=0x3F
uno.bootloader.lock_bits=0x0F
The extended fuse bits settings for the brown-out detection level (BOD) are:
0xFF (BOD disabled)
0xFC (BOD = 4.3V)
0xFD (BOD = 2.7V)
0xFE (BOD = 1.8V)
That is the level where the Arduino resets when underpowered.
A good manual for calculating the fuse bits one findes here https://www.instructables.com/id/How-to-change-fuse-bits-of-AVR-Atmega328p-8bit-mic/.
... with the Paper-USBasp Programmer

If one one want to burn the bootloader with an Paper-USBasp programming board the command to set the fuse bits is:
$ sudo avrdude -p m328p -c usbasp -P usb -U lfuse:w:0xFF:m -U hfuse:w:0xDE:m -U efuse:w:0xFD:m
And for the actual bootloader it is:
$ sudo avrdude -p m328p -c usbasp -P usb -U flash:w:optiboot_atmega328.hex:i
... with an AVR ISP Programmer
If one uses an AVR ISP Programmer to set the fuse bits one has to use this command:
$ sudo avrdude -p m328p -c stk500v2 -P /dev/ttyACM0 -U lfuse:w:0xFF:m -U hfuse:w:0xDE:m -U efuse:w:0xFD:m
And for the bootloader this one:
$ sudo avrdude -p m328p -c stk500v2 -P /dev/ttyACM0 -U flash:w:optiboot_atmega328.hex:i
Depending on the AVR ISP Programmer it could be that one needs the stk500v1 protocol instead of the version 2 (stk500v2).
... with the Paper-AVRISP mkII

If one has a Paper-AVRISP mkII one hast to type in the terminal the following. For setting the fuse bits:
$ sudo avrdude -p m328p -c avrispmkII -P usb -U lfuse:w:0xFF:m -U hfuse:w:0xDE:m -U efuse:w:0xFD:m
And for the actual bootloader:
$ sudo avrdude -p m328p -c avrispmkII -P usb -U flash:w:optiboot_atmega328.hex:i
Problem Solving
To erase all fuse bits one can use the attribute: -e
or even: -e -F
Sometimes a specific Baud rate helps, too: -b 19200
For verbose output use: -v
Burning an Atmega328 (without P)
When using an Atmega328 (without p) use “-p m238” instead of “-p m238p”.
Links
https://www.arduino.cc/en/Hacking/Bootloader?from=Tutorial.Bootloader
https://www.fischl.de/usbasp/
https://www.nongnu.org/avrdude/
https://www.ladyada.net/learn/avr/avrdude.html
License
This manual was made by Wolfgang Spahn 2010-20.
It is licensed under a Creative Commons Attribution-NonCommercial-ShareAlike 4.0 International License.
