Table of Contents
Paper-Duino-Hat

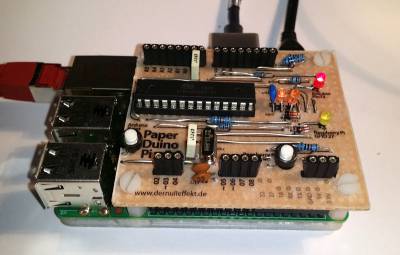
This is the latest version of the Paper-Duino-Pi. It is an Arduino Hat for the Raspberry Pi.
It has an Reset-Button (GPIO 22) and a GPIO LED (GPIO 27) on the board. The Serial connection is made over the serial GPIO pins, plus GPIO 18 for the Reset.
It works on the Raspberry Pi B+, 2 and 3.
Paper PCB
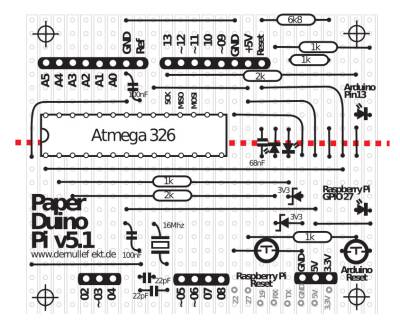
Parts
- Atmega328p
- 28 pin IC socket
- 4x low current LEDs
- crystal 16MHz
- 2x capacitors 100nF
- 2x capacitors 22pF
- capacitor 68nF
- 2x Z-diode 3.3V
- resistors: 2x 2kOhm, 4x 1kOhm, 1x 6.8kOhm
- 2x reset button
- one row headers, 2×8, 2×3, 1×4
- a 2×8 pin header
Installing the Arduino IDE
based on the code from: https://github.com/mharizanov/avrdude-rpi
Before starting make an update:
$ sudo apt-get update
$ sudo apt-get upgrade
Install the Arduino IDE:
$ sudo apt-get install arduino
In:
$ sudo raspi-config
Enable “shell and kernel messages on the serial connection” in Advanced Options/Serial.
Make a new folder:
$ mkdir paper-duino-pi
$ cd paper-duino-pi
Download the files:
$ wget http://dernulleffekt.de/programme/paperduinopi_v05/paper-duino-hat_01.tar.gz
And unpack:
$ tar -xvf paper-duino-hat_01.tar.gz
Run the setup:
$ sudo chmod 755 setup
$ sudo ./setup
Test the Serial connection:
$ ls -lh /dev
It should look like that:
crw-rw-rw- 1 root dialout 204,  64 Jul 10 20:24 ttyAMA0
lrwxrwxrwx 1 root root           7 Jul 10 20:08 ttyS0 -> ttyAMA0
Start the arduino IDE.
$ arduino
Upload your code with Arduino-Uno on the port: ttyS0.
Install the Shutdown Button and the LED
Go to your Paper-Duino-Pi folder
$ cd /home/pi/paper-duino-pi
Download the Python script:
$ wget http://www.dernulleffekt.de/programme/paperduinopi_v05/shutdown_and_blink_01.tar.gz
And unpack it:
$ tar xf shutdown_and_blink_01.tar.gz
Change owner & rights
$ sudo chown root:root shutdownbutton_hat.py blink_hat.py
$ sudo chmod 755 shutdownbutton_hat.py blink_hat.py
Create the autostart:
$ sudo nano /etc/rc.local
Write before “exit 0”:
printf ">>>>>>>> PAPER-DUINO-HAT 07_2016 http://dernulleffekt.de\n"

# run reset and shutdown script
printf ">>>>>>>> Starting shutdown aund reset button on GPIO 22\n"
/home/pi/paper-duino-pi/shutdownbutton_hat.py &

# blink an LED
printf ">>>>>>>> Starting blinking LED on GPIO 27\n"
/home/pi/paper-duino-pi/blink_hat.py &
To save and leave press: CTRL+O, Enter, CTRL+X
Reboot:
$ sudo reboot
Burning the Boatloader
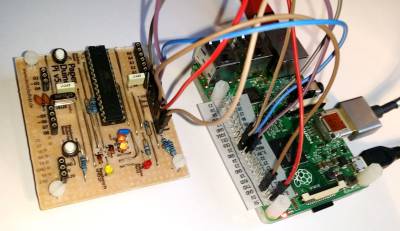
To burn the Boatloader on the Atmega328p chip on has to wire up the Raspberry Pi and the Paper-Duino-Pi like that:

 Raspberry Pi    |       Paper-Duino-Hat
 ======================================
 MOSI (GPIO 10)  |       MOSI (pin 11)
 MISO (GPIO 9)   |       MISO (pin 12)
 SCLK (GPIO 11)  |       SCK (pin 13)
 RST  (GPIO 25)  |       Reset
 GND             |       GND
 3.3V            |       5V
Run on the following commands:
Run the configuration menue:
$ sudo raspi-config
Enable SPI in Advanced Options/SPI, if necessary reboot the Pi.
Now there should be an SPI device in /dev: spidev0.0 and/or spidev0.1.
$ ls /dev
Go to:
$ cd /usr/share/arduino/hardware/arduino/bootloaders/optiboot
Erase the chip (some chips need that):
$ sudo avrdude -p m328p -c linuxspi -P /dev/spidev0.0 -e -F
Burn the Bootloader:
$ sudo avrdude -p m328p -c linuxspi -P /dev/spidev0.0 -U flash:w:optiboot_atmega328.hex:i
License
The Paper-Duino-Hat was designed by Wolfgang Spahn 2012-16.
It is licensed under a Creative Commons Attribution-NonCommercial-ShareAlike 4.0 International License.


